

Hi, my name is Sushant Maharjan, I am very glad to meet you today because you are here to read my article. Today I will be teaching you how to start a wordpress blog or website in 5 easy steps.
Also, I promise you that you will be happy after reading this article. Why? Because I’m here to show you secret tips for saving your money when you are creating your very first blog.

Yeah! it is top secret because no one shares these tricks on the internet. So without wasting your precious time let’s deep dive into to this article.
“Do you know Blog can change life? Even if your blog is small let’s say that if you have just one reader and your blog changes their life your blog is bigger enough”
Are you in hurry? Don’t you have time to read this article? alright then that’s why I created a video as well:
Table of Contents
So why we need a Blog/Website?

You need a blog for purpose of writing that could be anything related to the product, services, or guide just like this one.
Of course yes you can make money from blogging as well. But this guide is to start a blog not making money if you want to know how to make money? then Please read this as well! highly recommend to read the affiliate part
I really need to say that if I was you I might be happy because starting a blog these days (2018 )it is very easy to setup with just 1 click.
At past: It was damn hard to set up the site because we need to use FTP software’s and you need to be a tech-savvy little bit. Also, you will get a huge problem because those days it was not that good. However, these days it’s so easy to start a wordpress blog or website even a kid can do it.

My Guide for you will be super in-depth so that you guys can understand exactly how to start a wordpress blog or website within a minutes and start blogging today.
All you need to do is read this full article with step by step process, also image will be illustrated.
Why Not to Blog over Free Blogging platform?

You shouldn’t blog over free blogging platform because your vulnerable at all time because you have no control over your content if you violated the rule, then bam your out. They can shut down at any time they want.
You’re not allowed to monetize or advertise your blog if you’re using free blogging platform. This will make the lot harder for you to make money.
Hard to remember your long domain name like”websitename.wordpress.com, websitename.tumblr.com, websitename.blogspot.com… etc..” I think these domains are non-trust worthy even.
Which is the best blogging platform?
Only 1 answer, “WordPress” now I am not talking here about wordpress.com I am talking about wordpress.org which is completely free to use.
Here is why you should use WordPress platform:
- WordPress is opensource and everyone uses WordPress because it is very popular blogging CMS platform.
- Highly customizable among all
- Easy to install even kid can 🙂
- Highly secure
- You have control on your WordPress site yourself

So what are we waiting for 🙂 let’s go ahead and start a wordpress blog or website. 😉
5 Steps To Start A WordPress Blog In 2018
- Primary Email For Website
- Domain name
- Registering Web Host + Bonus(Secret Trick To Save Money/ Discount) & Installing WordPress
- Designing your blog and choosing a theme
- Writing content & publishing
Hey, guys Are you ready? shall we jump into step 1?
Primary Email For Blog/Website
Now, this part is not that important but I still recommend you to do it. As a website owner, you will need to put your email address on different pages on the website. Like on about me page, contact page, disclaimer, and policy!
But if you don’t want then you can just simply skip this step. 🙂 Feel Free!
And of course, we don’t want to get all of our emails in our daily inbox. So why not to create a specific email for your brand or website? yourwebsitename@gmail.com that would be perfect email for your website use.
By this way, you can organize your website email very handy. Not just that you can also create specific social media from that email for your website 😉 which I think is a pretty good idea.
Once you have created your primary email now let’s move to step 2.
Domain name
The very first thing I want you to think about domain / your website name. I really want you to focus on this because later you can’t change the domain name.
Make sure to think the name of what you are interested about. Like let’s say you want to launch health website then you want to name domain like it to sound for health. 🙂 Examples: Wikihealth, Healthy guide, Healthgeek, Health hacks… etc
Actually, the domain name is paid you need to spend money around $14-$15 on the domain because we want a top-level domain like .net .com .org for our brand.
There are also free domains but I prefer not to use free domains like website.blogspot.com, website.wordpress.com, there are a lot of these types of the free domain which make pretty weird.
Note: We will get all these top-level domain names for free. So guys please make sure you have not registered your domain right now. I will show you in step 3 to get it for free.
So guys make sure to think and use your own creativity for to have a good domain name. And also make sure that the name is available, it’s not like you will register google.com or another site that has been already registered.
You can go to whois.net and search your desire domain but make sure it’s not registered yet.

Also, it is very important to choose a short and pronounceable name. You can’t put your domain name with a word which is very hard to pronounce. But hey I got an idea, try to make your domain name speak by kids in your home. 😉 If they can pronounce then everyone can. 😉
The most time consuming is naming the domain so make sure to name the domain as I’ve already told you that we can’t change it later.
Here is a tip for you, we can add some letters to the word to make it pronounceable like [A, the, Why, … ] take an example of my domain name. I was planning to make it lifehax but unfortunately, it was already registered and I tweaked little bit adding “The” And now it’s thelifehax which I think is easy and short.
Reminding you guys again don’t register your domain we will register 15$ domain for free in step 3 😉
Once you are happy with your domain name, then let’s go we are ready to move to step 3.
Registering Web Host With Cheap Price + Free Domain Name
What the heck is web hosting now? If you don’t know what is web hosting don’t freak-out.
Web hosting is internet hosting service that will allow us to make any kind of websites accessible through world wide web (WWW).
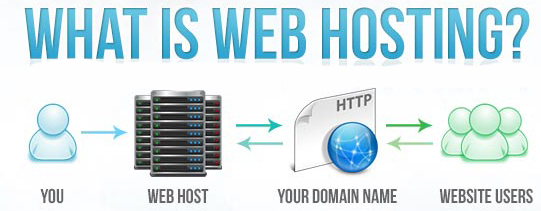
what is web hosting?
So that’s why we need to use good web hosting. However, web hosting will cost you to host your site on to their server.
Also, there is free web hosting over the internet but I don’t recommend to use free web host because it sucks. If you are planning to use free web host then your site will have a problem every time and at any time your account might get suspended.
Like this:
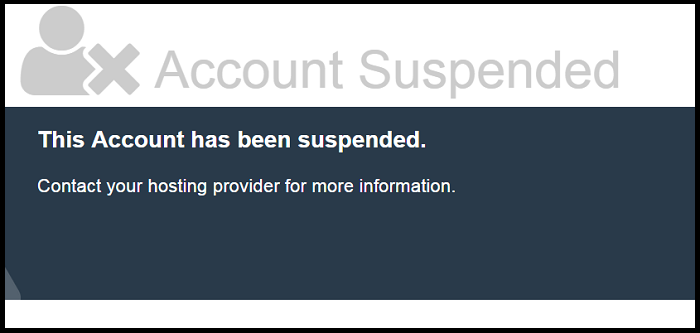
Yes, they will suspend at no time and jezz it will waste your time and energy. Trust me guys I have used and face this already and I don’t want you to face the same problem. (not recommended)
Also, there are paid shit hosts which will get you into terrible situations. I have gone through the GoDaddy host and it was just terrible from the day 1 after I set up my site it gave me a lot of errors. -_-
Which I think I wasted my $100 on their hosting only. That totally sucks, i also try to contact them but they didn’t give a shit. Also, I went through forums to see around if other people are also getting bad service from GoDaddy. And it was true all other people were also facing the same xD. GoFather sucks
So I left that shit host and migrated over Bluehost and till now I have no any problem at all with the Bluehost. The reason why i have joined Bluehost is that they are cheap, good and number 1 recommended web hosting by wordpress.org itself.
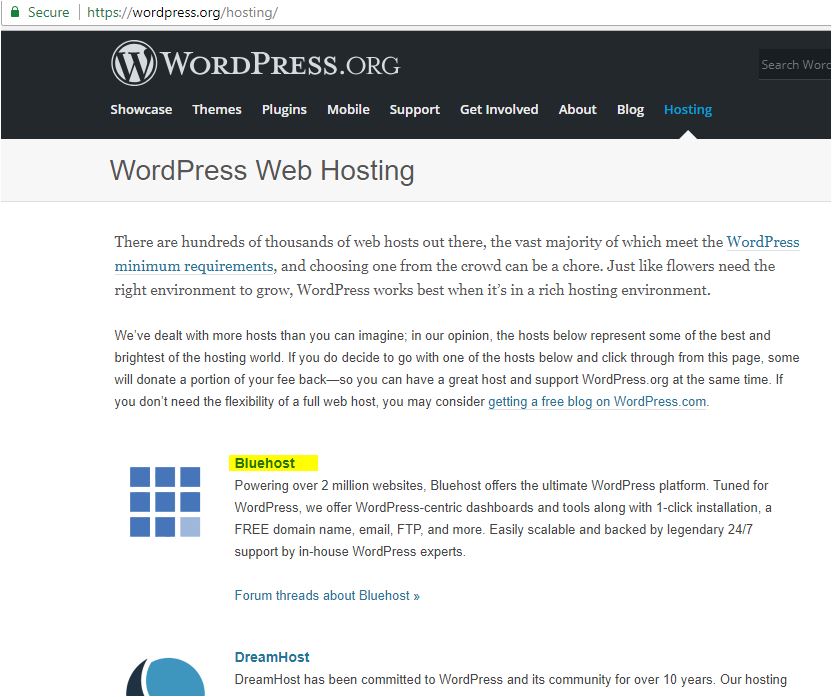
As you can see above picture that it shows you who is the boss.
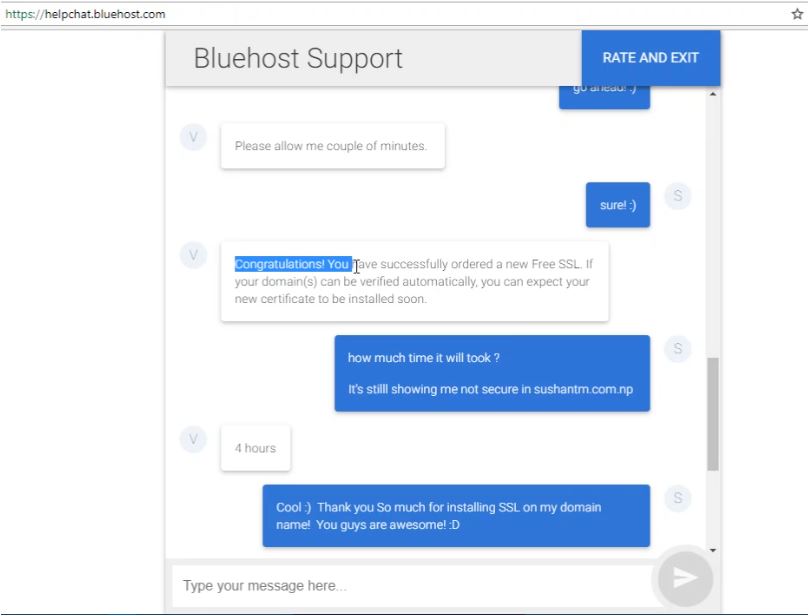
I love their 24/7 contact support. We can call them or live chat with them if you have any kind of problem. They will try to solve the problem as soon as possible.
Let’s say that you have deleted your site mistakenly and you want it back, just go ahead and contact them and tell them “I want my site to look same as yesterday’s condition” they will restore it for you. Best part they won’t take any extra charge, that’s what the customer support should be.
if you don’t believe me have a look on to this chat that I have just captured while ordering Free SSL on my domain name. 🙂
With Bluehost you can also have SSL enabled For free 🙂 So right now on my website, you can see that HTTPS green secure sign.
SSL
So, I highly recommend you guys to registered for Bluehost to host your site 🙂
![]()
![]()
Go to Bluehost by clicking here for discount and follow my steps given below:
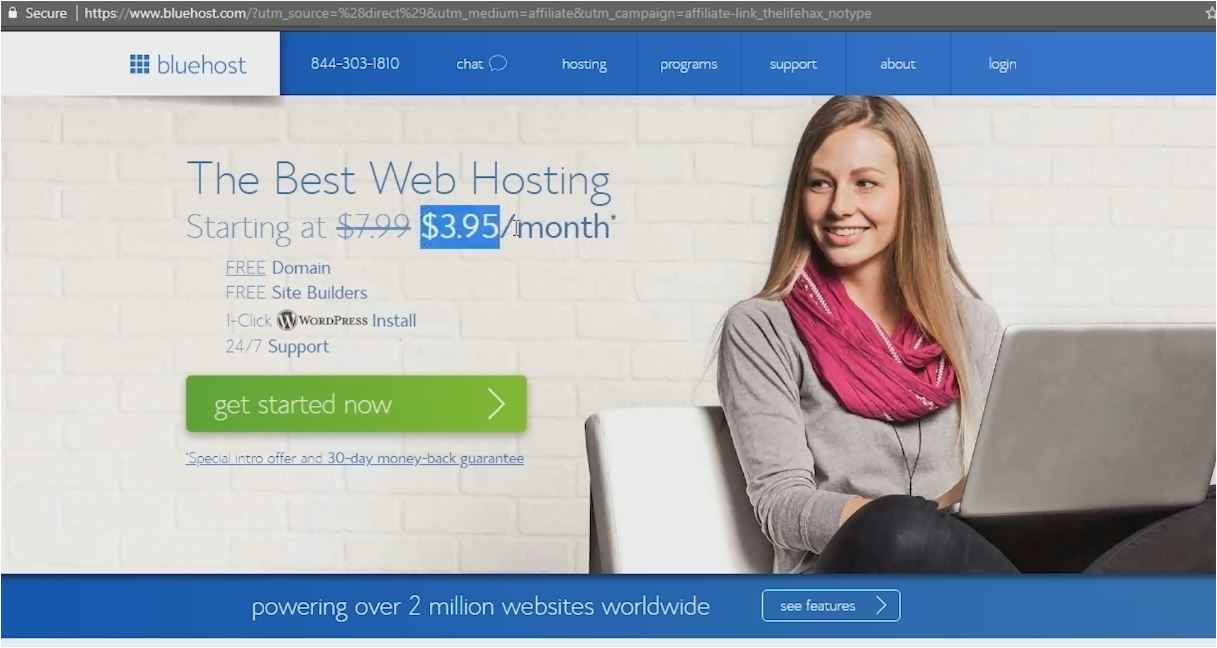
Once you opened the link from above you can see that picture above it shows “The Best Web Hosting Starting at $7.99 $3.95/month*” Don’t Worry we will buy this host in very cheap rate than this with my secret tip.
Note Must Read: Now I recommend you to read from this stage to until you have reached to the trick part, because if you don’t read it then you will miss a discount trick. 🙁 and sad part you won’t be able to get that trick back again.
I hope you understand and follow my all steps before moving to set up.
Very important: Now Don’t click back button on your browser if you do you will miss that trick again. So do not click back button if you want to get discount stay on that page.
So now follow very carefully:
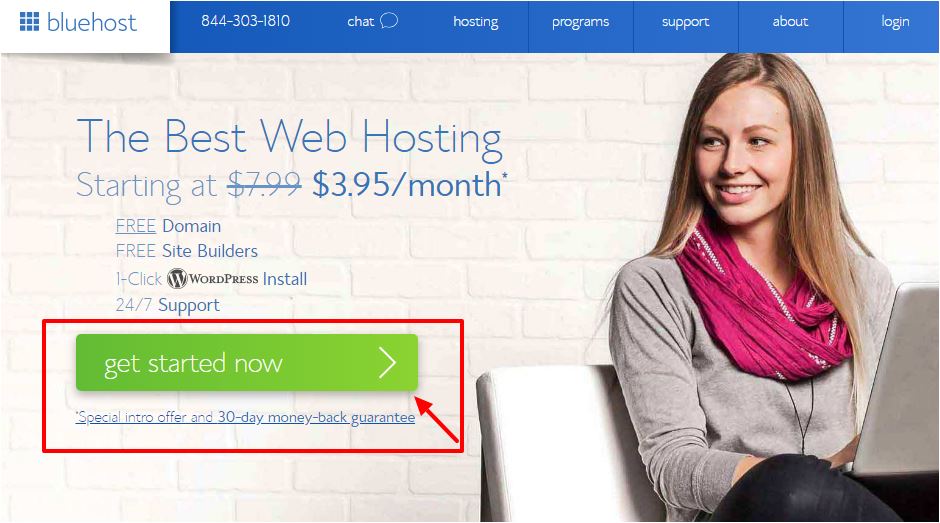
Click on the green “get started now” button,
Then Bluehost will ask you to choose your plan. You can select basic for the beginning but if you want to host multiple or unlimited sites better to choose plus/prime plan. 🙂
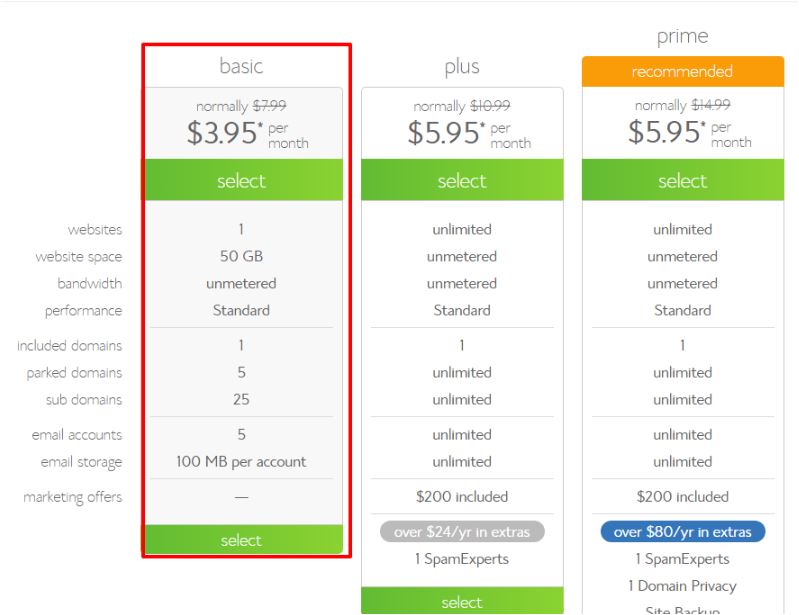
However, I recommend you guys to choose a basic plan if you want to run only 1 website/blog. Later you guys can also upgrade to plus or prime when you will get the ton of traffic.
So select the basic plan or your choice, then you will be asked for to enter your domain which Bluehost will give you for free. 🙂 Yeah, freebies! <3
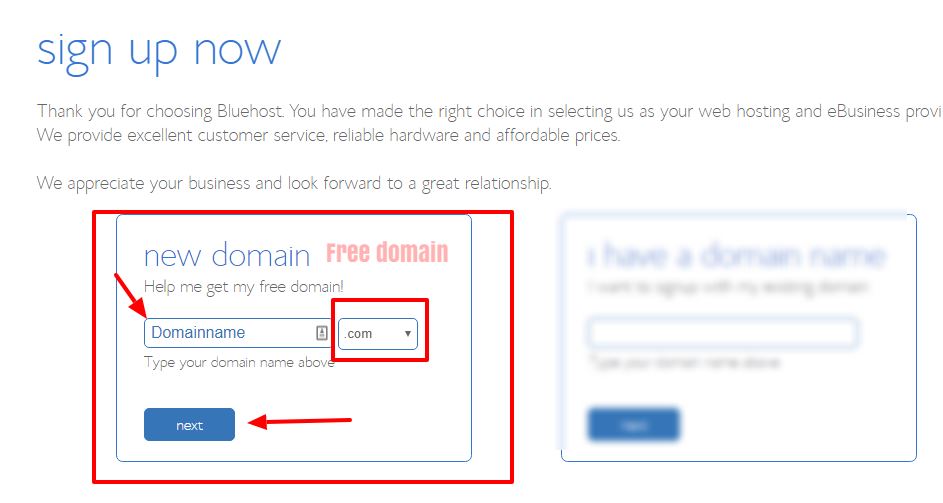
Now enter your domain you can select .com, .net, .org… anything everything is free don’t worry it’s freebie <3.
Once you have entered your domain name you will be asked to create your account. You can enter your details, name email address and all.
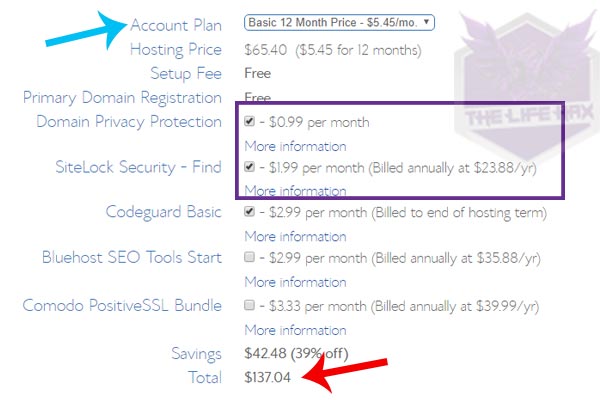
Right now you should see that your hosting cost a lot more like $137. So a lot of websites they don’t teach you how to save money while buying these things. I don’t know why but I think they just care about themselves to generate their referring income like they just want to make you click on that referring link.
But among all I’m not that kinda guy 🙂 I’m always completely transparent and I love to help you in cheap while buying these hosting and domain. Because I don’t want you to spend a lot of money on hosting. 😉
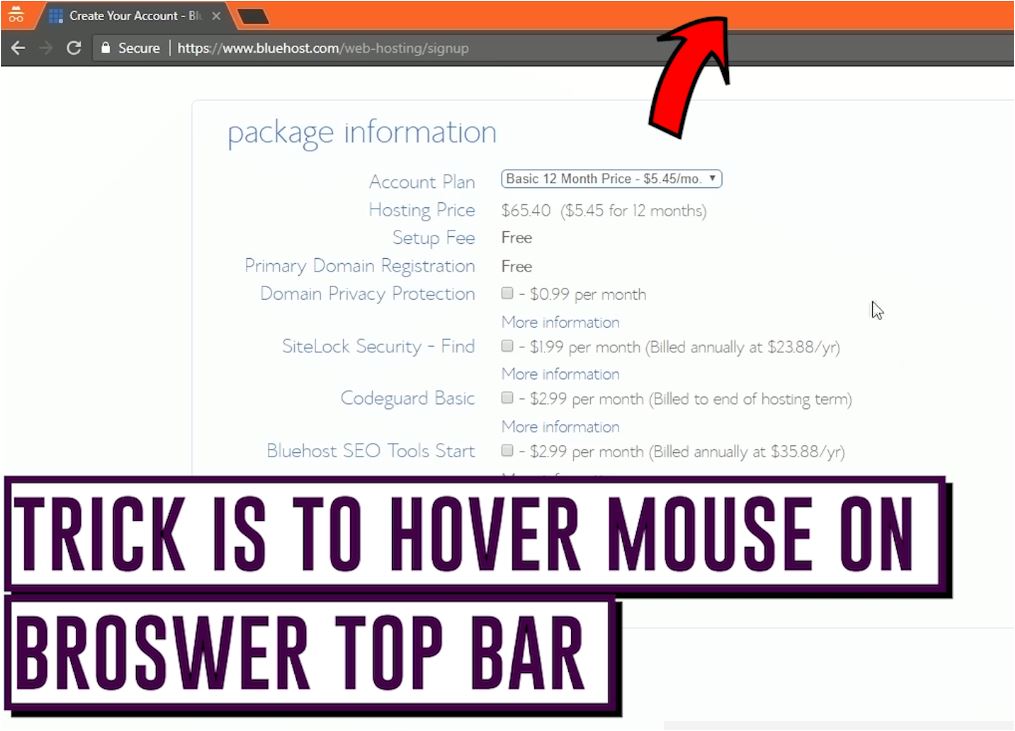
Trick part | Save money$ Buy hosting at the cheapest rate.
So here right now I’m sharing my secret trick with you and pay attention I will show you how to drop this money from $130 to almost $59 including all those features for free. Like “domain privacy, site lock security, and site backup pro, these tools are very expensive when you try to buy, but you will get for free. 😉
Now here is a tricky part “if you try to hover over the mouse top on to your browser tab like shown in the picture.Hover round “make a circle hover”
Just hover over that red arrow area and it should Show you a discount or save option. It will give you a discount option for saving money. 😉 If it shows you claim saving just go ahead and click on a claim it. 🙂 Feel Free to contact me if it didn’t show you up.
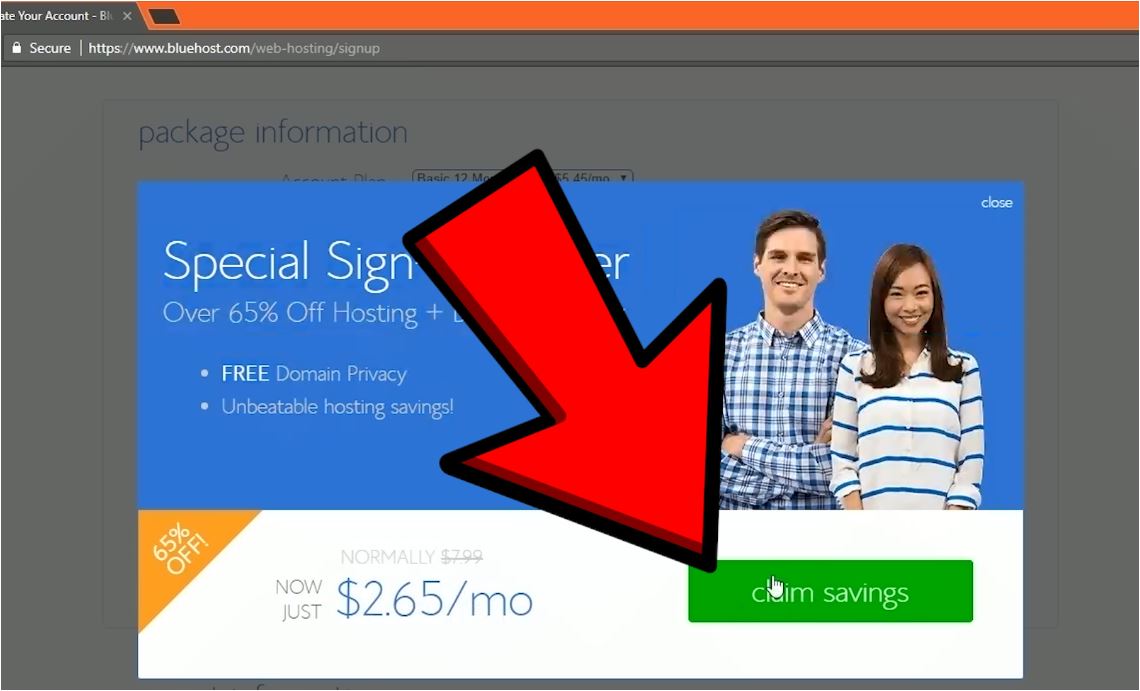
Note: Once You have clicked on claim don’t click back button because you will not get that chance again or you will lose claim :(.
Now follow up the article along again 😀
Now you can fill up your account details if you have not filled up yet and make sure to give a correct email address. 🙂
Then on package information set the account plan for 12 months /1yr if you wish to extend more you can do that as well 🙂
I recommend you to uncheck all the boxes because we don’t need does feature anymore. What we need we have already got for free. Like, Domain privacy, site lock security.
Now once you have done that unchecked all the box which are checked because we don’t need those features. Then you can see your saving and total amount to be paid.
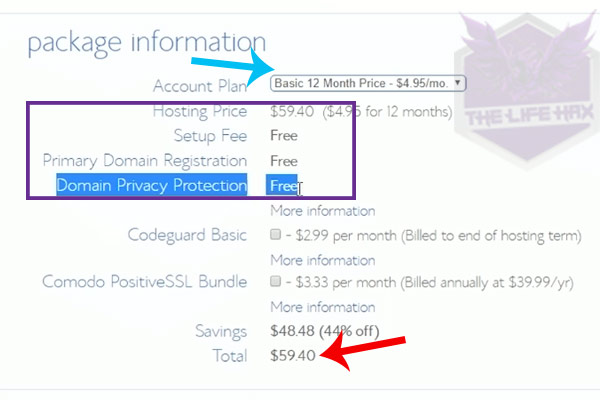
I think it’s a good price for getting good web host at such a cheap rate 🙂 You can see yourself it just cost $59 after we used the trick. If you don’t use that trick it will cost you around $65 without unchecked those boxes if it is checked it will cost you $137. 😉 I hope you are happy now 🙂
My back story: OMG whereas I wasted $100 on GoDaddy 🙁 sometimes it feels so bad why I didn’t find Bluehost at first. Anyway lucky for you 😉 I’m glad to help you always.
Once you are satisfied head over to the payment information. You can click on more payment option if you guys want to use your Paypal account if not you can simply use your credit or debit card.

use PayPal or debit card for payment!
Then check on “I have read and agree to Bluehost terms of services” and hit on submit. Once you guys hit on submit button it should show you congratulation page as shown image below:
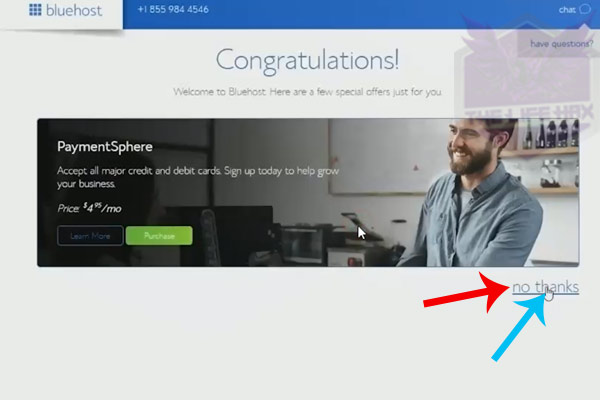
Now as you can see that Bluehost they have a special offer for you and they are trying to make you purchase that special offer as well but I don’t recommend you to do that. So guys simply click on no thanks. 🙂
Installing WordPress
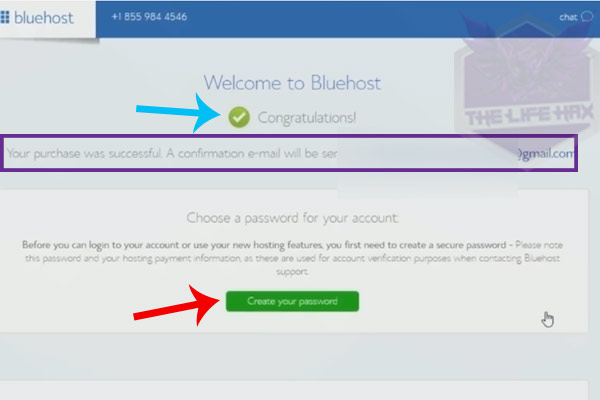
Once you click on no thanks, you should see a welcome to Bluehost congratulation.
Also, the confirmation email is sent to yourname@gmail.com! Now I highly recommend you to confirm the email by opening your email first because it’s important to do. 🙂
installing WordPress
Now you guys are ready to start a wordpress blog or website:
Remember that I told you earlier it’s very easy to install WordPress even a kid can do it. So that’s it guys, now Bluehost will install you WordPress for free and best part you don’t need to do anything.
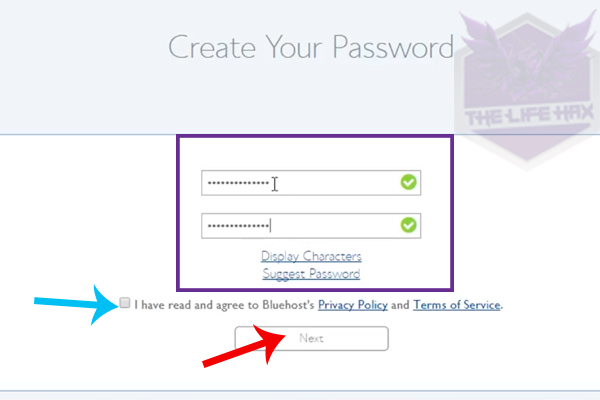
So guys let’s create a password for your account by clicking on that green button. Now make sure guys the password is unique with sprinkled symbol, letters and numeric.
Make sure it is strong that no one is able to guess that. Because if someone can guess your password, then your website might get hacked so please guys make sure to use strong enough password.
create the strongest password ever!
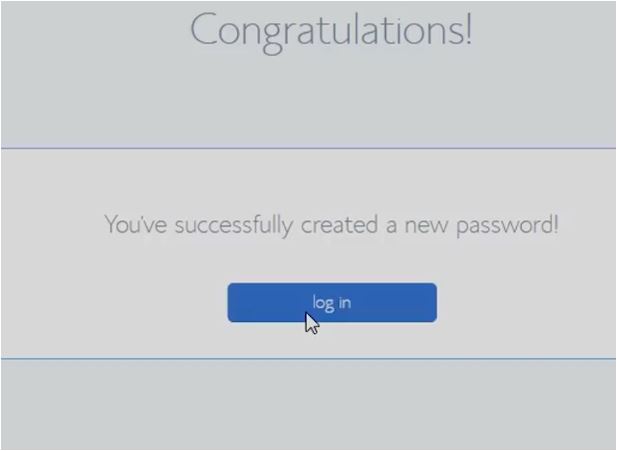
Now once you have done setting up your password click on “I have read and agree to Bluehost privacy” and then click on next then log in.
login
Now Bluehost will ask you for to choose theme template for you. But for now, you can scroll down and click on skip this step because we can theme later manually.
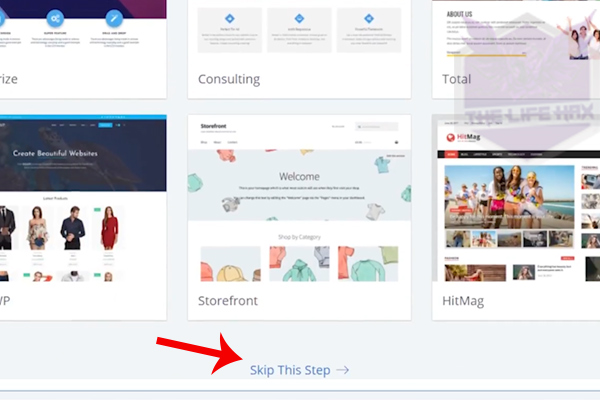
skip this step
Now as you can see Bluehost is setting you up your brand new WordPress site. Wait for 30-50 second or until the setting up process is done. 🙂
Now once the setup is done you can see start building or go to my Bluehost account. Then click on Go to my Bluehost account so that I can show you how to login to your website.
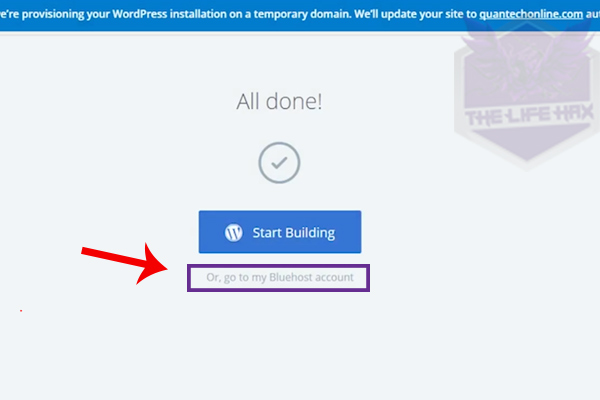
click on go to my Bluehost account
Now once you are in the brand new BlueRock C panel you can see Home, My sites, marketplace…Etc.
All you need to do is just click on login to WordPress by clicking on a big blue button. Also, you can manually open your WordPress admin login by going to “yourwebsitename.com/wp-admin”.
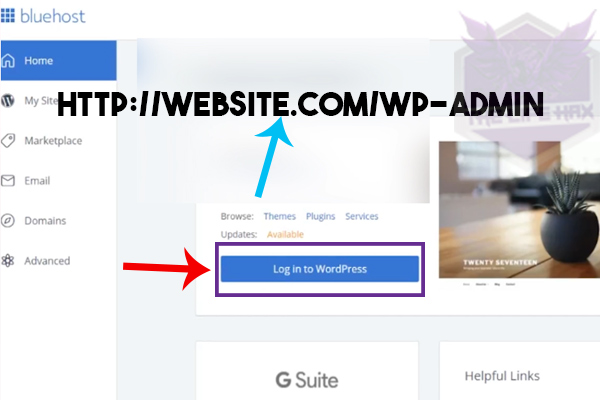
click on login to WordPress
It’s same you can use /Wp-admin for to log in to your website manually. Now You can use your username and password that you have created previously. Which I think is pretty good for saving your time instead of going each time on Bluehost for login to WordPress.

Congratulation once again that you have successfully installed WordPress on Bluehost 🙂
Now you guys are in the WordPress dashboard and you will be asked by Bluehost what you want to use your website as “business or personal”.
Here I recommend if you are going to use only yourself choose personally.
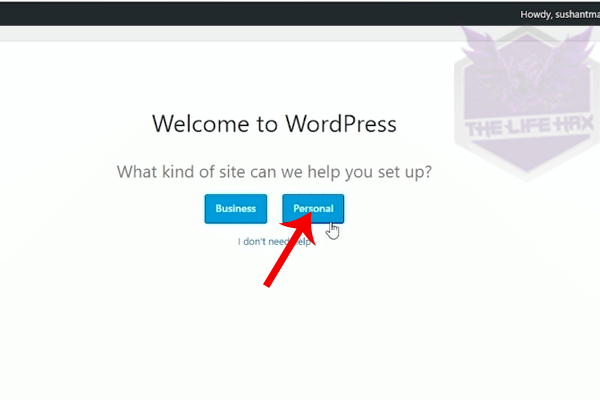
choose it as personal
You can also use it as a business if you are going to add some other user or your going to work as team member. 🙂
So it’s all up to you what you want to choose. It is the same thing you don’t need to spend tons of time for thinking about this.
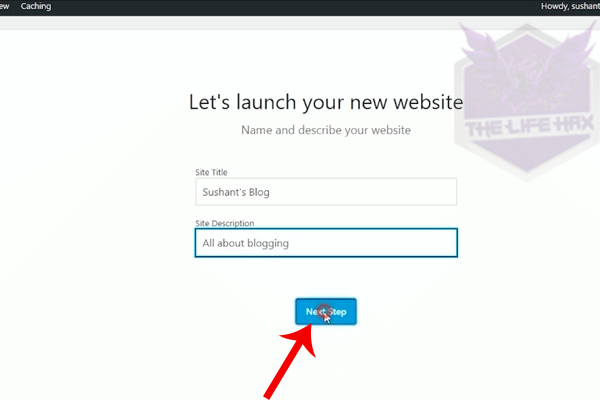
give a site title and give a sweet description!
Now on the “let’s launch your new website” at the site title you want to put your website name. On the site description, you want to put what is your site all about. Then click on next step.
Now once again Bluehost will ask you more question likes let’s launch. You can click on yes.
Then it will ask you for “what should visitors see on your homepage?” Now you will get 2 option here “Most recent news or updates / A static welcome page. Well, you can skip this process for right now.
Also click no if it asks you for the contact page.
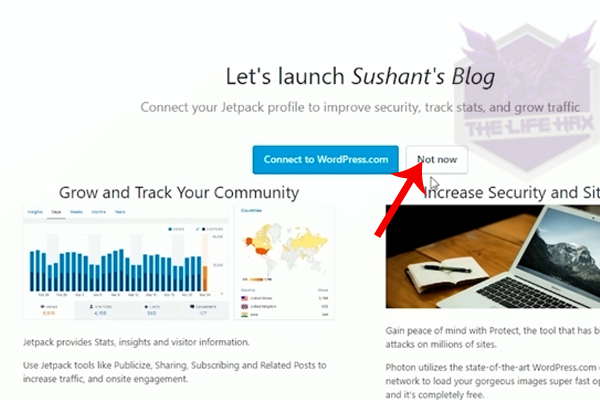
jetpack plugin
Now the final thing here Bluehost want you to connect your website with wordpress.com using a jetpack plugin.
So what is jetpack plugin? Well, guys, the jetpack is an awesome plugin every WordPress user use it.
Because it shows you very beautiful analytics on your WordPress dashboard which I think is very good. With the jetpack, you can do more things you can go here to see features.
If you guys want to use jetpack you need to connect wordpress.com if you don’t want then click on not now 🙂 because you can do this manually later by adding the plugin.

Coming soon
Now you guys can go back to your homepage of WordPress dashboard. If you guys try to open your website right now it should show you blank or if anyone opens your website it should show you coming soon page.
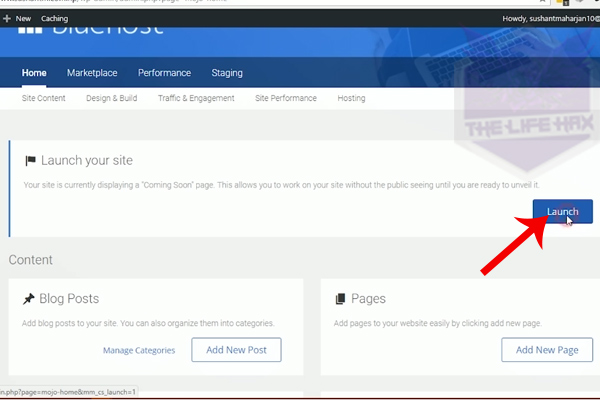
set to public
If you want to remove the coming soon page and set your site public. You can simply click on launch at launch your site. 🙂 Once you do this everybody can see your site even if it has no post.
Right now your website will just show you hello world post. Because we have just freshly launched our site right now. Now you guys need to add content I recommend you to add at least 10-15 unique content on to your site.
Because you will need it for designing your website as well. To make it look how your website looks like when you add enough content. No one likes to see blank website because it’s empty.
Design your blog and start a wordpress blog today
When it comes to designing your blog these are the thing we should follow up:
- Choosing theme
- Creating menu
- layout or looks
- Good looking Logo
But You really want to think that you want to have a blog type of website or static actual site.
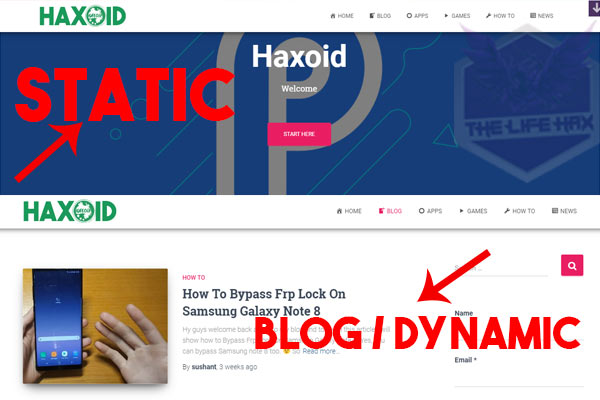
decide to choose static look or blog type?
Choosing theme
Now choosing a theme is very important while you’re building a website. There are tons of WordPress theme that you can find on market.
your dream website will come true
By using the theme you can make your dream site comes true, or how you want your website to be looked as.

themes
Now to choose a theme you can go ahead to appearance and click on themes. You can see some themes there including a default theme that we are using right now.
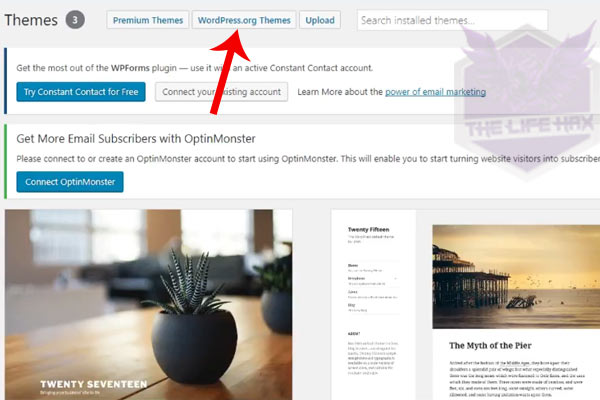
click on wordpress.org
But what you can do here is you can click on wordpress.org themes button above. However, these are just free themes. Now if you guys want to make your dream site comes true then I don’t want you to choose the free theme because with this theme you will not be able to make your site look badass.
You can see my current site as well and I’m using the premium theme and also you can see all the popular website they are also using premium themes.
Why use the premium theme?
Free themes are very easy to find also it is freebies and good for the new site launched. But Free themes have very fewer features (limited). Not just that these themes are not unique when you try to compare it with premium themes.
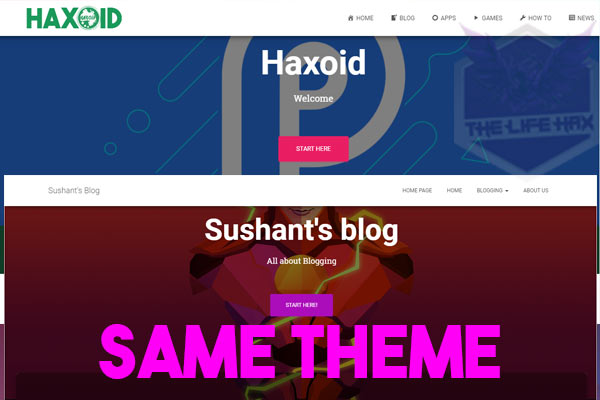
notice that same theme?
Since anyone can download free themes without paying a buck. You will start to notice that lots of similar websites that matches with your site and it just look unprofessional. Why? Because these themes have limitation while you try to customize it.
But with the premium theme, you will have a unique look. Because these themes are used by less while you compare to free themes. Your website will look bad-ass Professional not just that you will also have support and updates you can contact themes as well.
Here is the big advantage of using the premium theme:
- You get more features
- You Get more customization
- As more competition in the premium theme, you can get themes at a lower price.
- Will get drag and drop builders
- shortcodes
- Get Mulitple Layout and templates
- You can choose your favorite color in any places you want to splash it
- More…
So, guys, you can see the vast difference between paid and free themes right now.
Now I recommend you to use the premium theme as possible as you can. It will also give you good looking and also on SEO ranking and page speed will be also optimized as well. Whereas free themes will not give you any shit.
Hey wait, can I used cracked / hacked/ Nulled theme?
No, you can’t because your site will get hacked those nulled themes will definitely have Backdoor/viruses. If you upload that theme file hacker can access your entire server because you gave him access to uploading his virus file.
Now he can penetrate on your server, he can breach your site he can shell and deface it. Even, he can change your hosting password. Then you will be not able to do anything.
So, this is very dangerous I will not recommend this method. I already work as ethical whitehat hacker past 2 years so I know these stuff very well. I don’t want you to get into these type of situation. So stay away from paid themes for free or cracked /nulled.
So which theme is better to use?
Now I will tell you in my experience, in my opinion, the theme from elegant themes will be better because they provide you huge customization. I’m sure that you can customize your website in such a way that your dream site will come true.
What theme is this website using?
If you are curious to know what theme I am using? it’s Divi by elegant themes. You can edit Divi theme easily as shown below image. 🙂


Click here to get Divi by elegant.
Note: You will get all themes access once you join and signup which is pretty awesome.
Well, I think we should move to real designing right now.
So if you decided to use a premium theme by Divi I will be making a separate tutorial for you so you can click here for that. Also, there are other premium themes on theme forest you can decide to choose your suited one 🙂
Creating Menu & Adding Posts
So First you want to create a menu and category and pages so that you can make your own navigation.
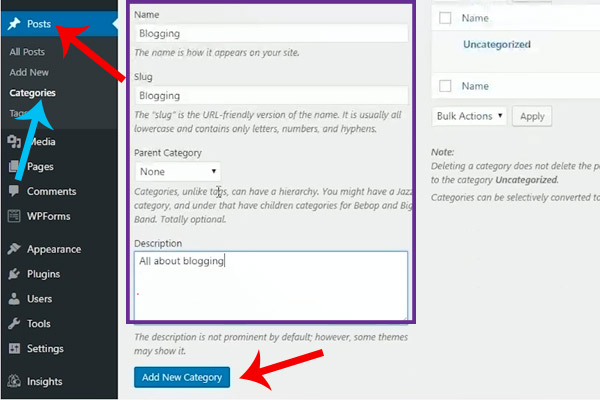
create category
First let’s create a category, to create that, hover over the post and then click on categories. Now you can name the category that you are going to write about.
Note: We are going to use category as your navigation header
So, guys, you need to think first what you want to write a post about. Let’s say you have a health and fitness content, then you should definitely create a category about weight loss, healthy life, Yoga. right? it will something look like this:
category menu style
So in my case, i will use it as a blogging here so at the name and slug enter the name as blogging. Add up some more category list that you want.
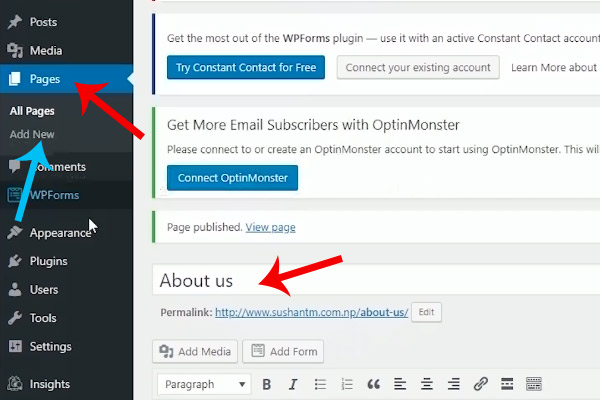
adding pages
Once you are happy with category now create pages. Hover over pages then you can once look all pages then add up some other pages like about us, contact pages. Etc and publish your page 🙂
Let’s create the main menu
After you have created both pages and category you are ready for to create a header menu. :)All you need to do is hover on appearance and click on Menus.
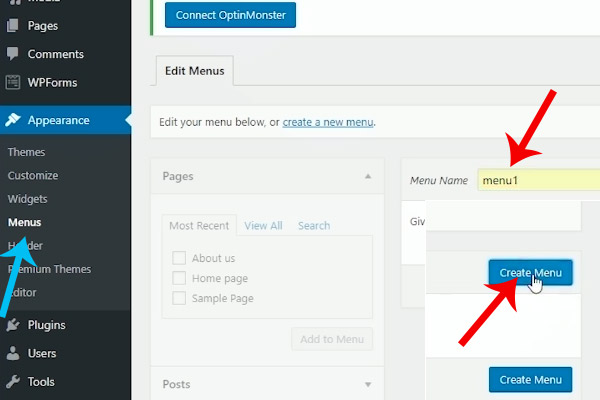
create your first menu
Now you can see that you have no menu here so first thing is you want to create a menu. So name anything you want I will name as menu1 and press on create menu button.
Congratulation you have created your first menu. Now, this is like a recipe book menu. At here you guys want to see your left side there is a post, pages, custom links, and categories. So we will be using pages & category from there if you want you can also use custom links as well. 🙂
Now click on pages first and then click on view all then add up home and about us pages. Then once again click on a category and select all category you want then add those too.
After you added category and page it should something look like this:
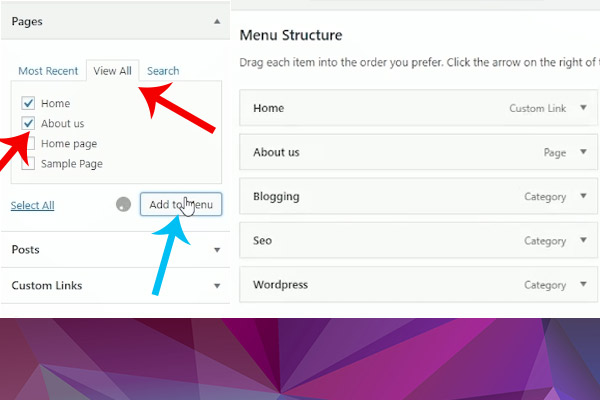
structure of your menu
Now you can drag and drop any of this category anywhere and to create a drop-down list you can drag right and it should just look like this:
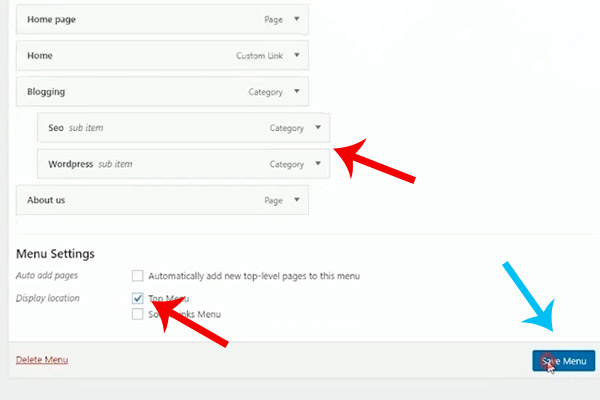
create some drop down menu and click on save menu
Alright, guys now once you have done making your category then click on primary menu then click on save menu also now you can check your website and bam there you go.

menu navigation
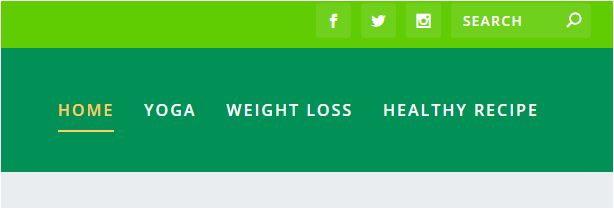
You have a nice looking nav bar.
Adding post / Content
If you have already written content then it’s very good, but if you don’t have, don’t worry you can use dummy text and use that as content because we need to design blog with some few posts.
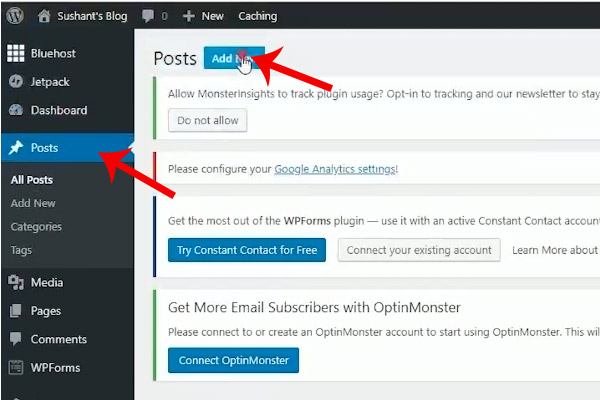
add new post
To create your post head over to the post then click on add new post now you can add any title you want. Then go to dummy text generator and generate about 800-1000 words of text then paste on to your content area. But it is not a good idea to add a lot of dummy text.
This is just a dummy text and you don’t want to use this always. You want to add content from your own creation later after when your blog is ready 🙂
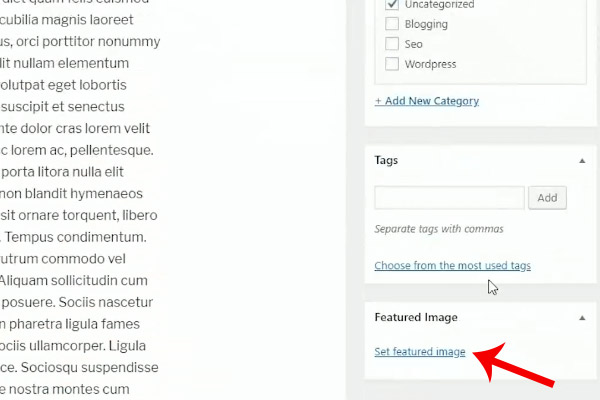
set feature image or thumbnails
Then scroll down and add some feature images by clicking on feature image just upload any picture for a demo.
Now Do the same process 5 – 6 time so that you will have 5-6 posts ready 😀 and we are ready for designing a theme. 😉
For now, we will be designing simple new theme where you are able to customize header, footer, widget, and so on. But as I’ve already told you that with free themes there is limitation while customizing.
So guys from wordpress.org theme pick up any themes that you think it will suites for you. Also, all themes are different and it will not have the same feature so keep that in mind.
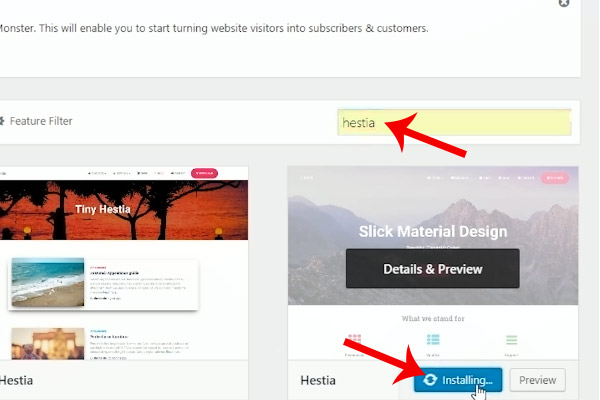
choose Hestia theme
For this tutorial, I will use Hestia theme because it looks beautiful and professional. To choose Hestia you can type Hestia on the search bar and install then click on activate 🙂
So guys layout and looks are important here because you can completely change the look of your website.
Now, guys, you want to think here and ask yourself once again! do I want a static page or latest post? However, you guys can decide this later as well because you can change at any time.
Now as you have activated your Hestia theme on your WordPress blog it should something looks like this:

first impression for your site
Then now you guys want to change this each and every part so that your blog represents you. We don’t want to leave it to default as it is because it makes no sense at all.
So to customize the theme go to Appearance and then click on customize as shown below:
customize
Then as always, every free theme has different ways to customization but with Hestia, it is very easy to customize. Now you can see that you’re in customize of WordPress and you can also see those pencil icon.
click on those pencil icons
So to change those part you just need to click on pencil icon 1 by 1 🙂 Which is very easy and you won’t get these feature in another free theme. 🙂 Making easy for editing is the beauty of this theme.
To change static go to home setting and choose homepage as Homepage as shown below:
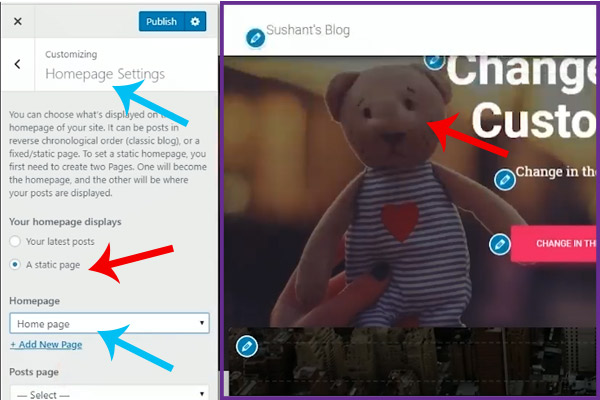
this is static look
You can see it is the lot better than last time 🙂 once you’re happy with this then you can also choose the layout of your site by going to appearance setting > general setting (in customize) 🙂
Now there you go that’s all you can do with the free theme 🙂 Now hit on publish and you’re ready to start posting you’re all of latest content. Share your new website 🙂
This is mine :
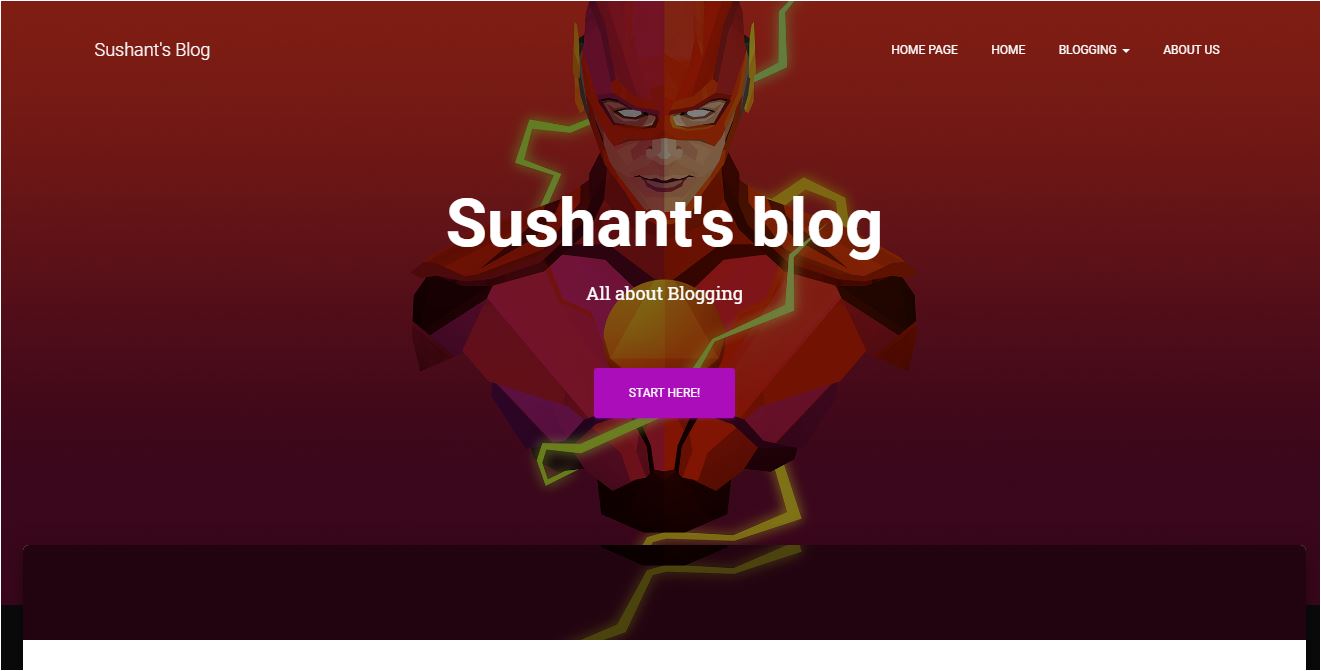
how to start a wordpress blog in 2018
Wrapping up
Well, that’s all and this is how you can start a wordpress blog or website. It’s that simple and easy to do I hope you guys have learned a new thing today.
If you still have a question you guys can comment down below. If you want to reach me you can contact me on my Facebook page 🙂 I’m always ready for to help you out.
Sign up for my newsletter to keep up to date:
[rainmaker_form id=”499″]


0 Comments